North Brisbane Lapidary Club

We Dig Rocks

  • Email
  • Facebook
  • Home
    • Activities
      • Gem Cutting
      • Fossicking
      • Metalsmithing
        • Beginner Silversmithing Projects
      • Gemmology
    • Membership
      • Constitution of the North Brisbane Lapidary Club Inc.
      • Costs and Fees
  • Visit Us
  • Gem Shows
    • QLACCA Gem Show Dates
    • Raffles & Prizes
    • Gem Shows Photo Gallery
    • Gem Show Dealers & Traders
  • News
    • Blog
      • Gem Show
      • Work Sessions Activity
      • Club event
      • Cabbing
      • Enamelling
      • Faceting
      • Fossiking
      • Metalsmithing
    • Newsletter Archive
  • Member’s Area
    • Calendar
      • My Bookings
    • Suppliers
    • Resources
    • Gems, Minerals and Rocks
    • Competitions
  • Log In
  • Log Out

Butterflies

July 1, 2021 By Carol

by Carol M

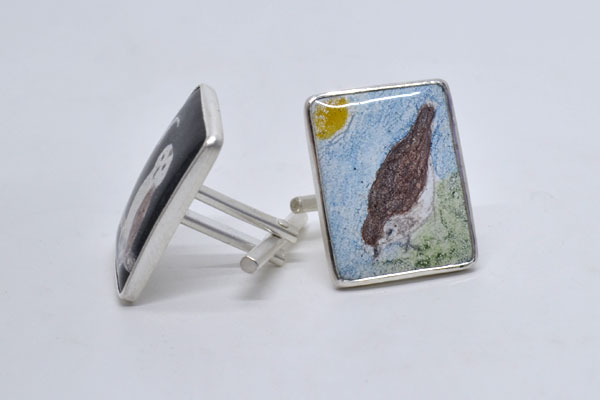
I have been playing again. This time using silver foil and enamel paints.

It started with a demonstration of sawing/piercing to some of our newest converts to the Silver Smithing area.  I thought I would demonstrate that sawing can be used not just as a means to cutting links for making chains.  I had seen some beautiful enamel work on Facebook with leaves and butterflies so thought I would give a butterfly a try.

I started by using my Wildlife of Greater Brisbane book to find a butterfly with the colours I thought I could reproduce, especially some of the transparent colours that can be achieved on silver foil.  See the Meadow Argus (pictured above). I then drew a diagram with a plan of the colours I would use and how that would relate on the copper. I then used a flux on the copper before placing silver foil on the areas I wanted to shine.  The rest was wet packed and finally enamel paints on the final layer.

Most of the work was torch fired, because I was impatient and doing it at home, but ideally as the piece was so big it would have been better kiln fired.  It was hard to keep the heat on the whole piece.  The last fire I did do in the kiln just to give it the gloss finish.

Filed Under: Enamelling

Stained Glass part 2

June 3, 2021 By Carol

by Carol M

So this is my second attempt at Plique-À-Jour enamelling. Not good enough to give to my friend for her 60th as I had planned, but ending up as an addition to my ever growing collection of earrings.

I started out laying the piece’s flat using the mica sheet, as with the test samples on the previous post, and filling in the areas with enamel. The enamel still sticks to the mica sheet and has to be then cleaned up, this led to cracks or the enamel falling out completely. I think maybe using 0.5mm fine silver was too thin, not giving enough thickness for the enamel to adhere to.

I then switched to the suspension method, using trivets and only very small amounts of enamel in the areas to be enamelled, building the layers very gradually. The first firing I let the kiln get too hot as the enamel dropped out, but I persevered being very careful not to let the kiln temperature reach over 785°C on subsequent firings.

This is very time consuming and I think I have spent at least 12 hours on these earrings, I am afraid to say this technique will have to wait until I have more time before trying again!


So I then tried the Champlevé technique, where areas of silver are either etched away to allow enamel to be laid into them, built up until they are the same height as the silver.  Instead of etching I tried another first for me and having pierced a design in a piece of silver, I fused it to a base plate.

Fusing, again a technique to be practised, there is a fine line between fusing and melting. I was getting better but as you can see there is some reticulation. The idea behind fusing is that you get the very shiny surface as a base for the transparent enamels but I have also read that by texturing the base it gives an interesting look to transparent enamels.  In this case I went with the texture.

Filling the areas with enamel was a much simpler solution than the Plique-À-Jour, but the enamels have still not come out as transparent as I was hoping.  Not sure if this is due the textured base or not freshly cleaning the enamel.  Maybe there will be a part three to this post ……

Filed Under: Enamelling

Stained Glass

April 22, 2021 By Carol

by Carol M

Here are some samples of my first attempts at Plique-a-jour enamelling technique (French for “letting in daylight”).

After piercing a design in fine silver, I applied translucent enamel. The first firing I used a piece of mica to prevent the enamel from dropping through, subsequent firings I relied on surface tension placing the piece on trivets. To obtain clarity with no air bubbles only small thin amounts of enamel can be added at a time so a pretty time consuming technique.


After the gaps had been filled I removed any surplus enamel from areas on the silver, and also managed to remove large chunks from 3 of my nails and some skin without noticing! Not sure if I was concentrating hard or it was as it was under cold running water that I did not notice. Lastly one more firing to make the filed glass shiny once more.

The biggest lesson I learnt was to protect my fingers when cleaning up! I also think the areas of enamel to silver need to be larger to give a better effect, and perhaps better washing of the enamels would give a clearer effect.

Having a go was the best lesson.


Filed Under: Enamelling

Cuff Links for a birdwatcher

December 17, 2020 By Carol

by Carol Money

These cuff links were made for my brother-in-law’s 60th birthday (which was back in March 2020!) and are now ready to send (Dec 2020).  He is an avid bird watcher and photographer.

The inserts are enamelled using white powder as a base and then painted with enamel overglaze paints and fired again.  They represent day and night with a skylark and a barn owl.

The fastening devise is all hand fabricated using round wire put through the rolling mill, sawing to achieve good corners, soldering and rivets for the rotating piece.

Filed Under: Enamelling, Metalsmithing

Enamelling samples

October 8, 2020 By Carol

Encouraging all enamellists

Katarina and I have been busy adding a little colour to the kiln corner, had any of you noticed?

We have made samples of all the opaque colours available in our stock, and will be working on the transparent range over the next few weeks.


by Carol Money

A little inspiration for any budding enamellists out there.

Some summery earrings I made to practise my piercing skills, that then just begged to be enamelled.

I used a clear flux enamel and then torched fired them, holding the heat on them after the enamel had melted to achieve the colour.

Filed Under: Enamelling

Dragons

July 10, 2020 By Carol

by Carol Money

I have been dabbling with some cloisonne and transparent colours enamelling. The earrings are made from copper, with a layer of silver foil and several blended layers of translucent enamels. Ideally a kiln would have been used to fire the pieces but having to work with what I had at home, they were torch fired.

These ear-rings were made for another of my friends that has turned 60.  We met while dragon boat paddling, hence the dragon.

I know that one of the pieces should have been facing the other way (I was sure I had worked it out but it appears not!)

Filed Under: Enamelling

Show & Tell – Enamelling

June 5, 2020 By Carol

by Carol Money

Enamelled Poppy Earrings

The story of the Enamelled Poppy Earrings

After a fun course on making copper flowers run by Sandy, I made some simple copper flower earrings to give to my friends on a trip to the UK. They were so well received I was asked by one of my friends to make some more, but if possible red so they would look like poppy’s.

Last year, on remembrance day, I realised I did not have any poppy earrings of my own and on emailing with my friend in the UK, neither had she. As she was also celebrating her 60th birthday that year the plan for some special poppy earrings began.

As many of you know I do like to dabble with enamels as well as silver work and thought it would be effective in the design to use a transparent red over silver, plus set the earring properly with a bezel as opposed to a hole drilled in the piece somewhere.

I eventually managed to finish them and posted the parcel to the UK in March, it eventually arrived in May.

I am happy to say my friend loves her earrings.

I am now excited by the prospect of getting back to the club soon to experiment with some more enamelling techniques soon.

Filed Under: Enamelling, Metalsmithing

Enamelling

February 23, 2016 By Raymond Wilson

Another great workshop last weekend saw another 7 members learn new skills in enamelling, thanks to our instructors Helen and Carol.  A fun weekend with a variety of creative talent on show.  Some fantastic pieces were created and some participants have already finished their items into jewellery.

enamel1

enamel3

enamel2

Filed Under: Enamelling

Copyright 2014 · Website Design Brisbane

Insert/edit link

Enter the destination URL

Or link to existing content

    No search term specified. Showing recent items. Search or use up and down arrow keys to select an item.