The first 6 photo’s are from Marie-Ann and are the beginners efforts at lost wax casting. Below that are 3 photo’s showing Thierry’s results casting using organic materials. Overall it sounded like a very successful session.


We Dig Rocks
By Carol
The first 6 photo’s are from Marie-Ann and are the beginners efforts at lost wax casting. Below that are 3 photo’s showing Thierry’s results casting using organic materials. Overall it sounded like a very successful session.


By Carol
by Ray Wilson
History of casting
Investment casting dates back thousands of years. Its earliest use was for idols, ornaments and jewellery, using natural beeswax for patterns, clay for the moulds and manually-operated bellows for stoking furnaces. Examples have been found around the world: from Mexico to Mesopotamia, and Egypt to Africa where the investment casting process produced detailed artwork of copper, bronze and gold. The earliest known text that describes the investment casting process (Schedula Diversarum Artium) was written around 1100 A.D. by Theophilus Presbyter.
Navajo Indians used tufa stone to create impressions in the soft stone and then pour in molten silver in the early 1800s.
History of Casting in NBLC
The first lost wax casting was introduced into NBLC by Ross Chapman about 20 years ago. Initially Ross used a car tyre pump in a home built apparatus to “suck” the molten metal into a mold. As members became more interested, the club invested in better equipment. A computer controlled kiln and centrifuge were purchased, with Ross building a shroud around the centrifuge using a stainless steel drum from a washing machine drier.
Ed Hindmarsh built 2 vibrating tables and donated to the club to assist with removing air bubbles from the investment.
Tom Power then built and donated a vacuum table so that the air was removed from the investment, giving better quality results.
Over the years we have continued to improve the process where we now have over 90% success with castings; a very good result considering how many touchpoints there are where members have been involved in the process. From weighing the waxes, to spruing correctly, to vibrating the investment to providing the correct weight of metal, to ensuring the torch flame is a neutral flame, to ensuring the metal is completely molten; all of these areas can and do cause problems with the outcome. Some clubs as part of their casting process sprue all of the required models into one flask. This is all controlled by one experienced member. NBLC has retained investing individual flasks; exactly as Ross started us off. This means individual members have more control and more involvement in the casting process, but it also means that the requirement for volunteers to assist in the process is more intensive. It is a credit to all of our members who participate in the casting workshops, so that other members enjoy an interesting sideline to the hobby of lapidary.
In the last 10 years, we have also conducted cuttlebone and broomstick casting with members leading these new endeavours.
Sand casting has also been conducted by Kirra-Lea Jewellery on a contract basis for members.
Varieties of casting
Lost Wax
Lost Wax Casting is as the name suggests. A wax model of an object is placed in a steel flask with a plaster mix poured in to fill the flask. The flask is then “burnt out” over several hours so that the wax vaporises and leaves an empty void where the object was. Metal is then melted and induced into the void in the flask using either vacuum or centrifugal force. At NBLC we have continued to use a centrifuge on the back of the good results we achieve. The wax object can either be carved from wax rolls or sheets or by purchasing commercially available models of rings and pendants.
Organic material like flowers and gum nuts or seed pods can also be cast using this process. As long as the object can burnout at under 700 degrees Centigrade and can hold its shape under the weight of the investment mix then it can be cast in metal.
Further research: NBLC has several books in the library that specialise in lost wax casting. Murray Bovin’s Centrifugal Or Lost Wax Casting is an excellent guide for anyone who wishes to learn more about this process

Commercial waxes cast using Lost Wax Method

Commercial ring casting in Sterling Silver
Sand Casting
Sand casting is a process where a special type of very fine grained sand is pushed under pressure into a frame and then the object you wish to cast is pushed into the sand to make an impression. Once the object is removed, the 2 halves of the frame are locked together and molten metal is poured into the frame to create a copy of the object.
Further research: https://www.KirraleaJewellery.com is the web page of Kirra-Lea who has conducted sand casting lessons at NBLC.
Craig Dabler is an American who specialises in sand casting equipment and supplying sand to hobby casters. Craig has several videos on You tube that go through the sand casting process. https://www.youtube.com/watch?v=wlzb_9KhEQw.
He also sells kits and tools at:https://www.diycastings.com/

Sand Casting Frame

Red Sand for Sand Casting
Cuttlebone Casting
Cuttlebone is the internal shell of a squid like mollusc called a cuttlefish. The shell is made of Aragonite, a form of calcium carbonate, that is soft enough to push an object into to make an impression or objects can be carved using simple tools. Cuttlebone casting has been in use throughout the Mediterranean countries since at least the 16th century. Similar to sand casting a mold is made using 2 pieces of cuttlebone, where a shape or object is impressed or carved, the 2 pieces are bound tightly together and then molten metal is poured into the mold. The beauty of cuttlebone casting is that every piece is unique depending on the shape of the ribs within the cuttlebone. It is also a reasonably easy process to undertake without the expense of kilns and centrifuge like lost wax casting.
Further research: Tony deLuca is an authority in cuttlebone casting and has taught classes in cuttlebone casting for over 30 years in Ontario. Tony has several short videos on his web page demonstrating cuttlebone casting. If you are interested in cuttlebone casting these are worth warching at:
https://www.facebook.com/Cuttlebone-Casting-Book-by-Tony-DeLuca-579755289131760/videos

Cuttlebone Casting

Cuttlebone Casting – pendants
Broomstick casting.
Broomstick casting is a technique used to create unique forms. Millet straw from a straw broom is bundled tightly together and then molten metal is poured down the top of the bundle. The molten metal shape is formed by the metal running down and around the straw. The shapes are unpredictable and unrepeatable which can provide an interesting organic piece of wearable jewellery. However unlike cuttlebone or lost wax casting, you can reuse the broomsticks – just clean out the metal and re-bundle and tie tightly ready to cast again.

Broomstick Casting

Broom Casting with bezel set stone
Casting in Jewellery
Casting has a wide range of use in jewellery; specifically, commercial jewellery is predominantly cast, as the cost is significantly reduced compared to hand manufacture. For the hobbyist though, casting can be used to supplement hand made pieces by adding texture or contrast. Cut gems can be added to cast pieces to add colour to the cast item.
Casting of stones in place is used in some circumstances. The rule used to be red,.blue green are suitable stones, meaning ruby, sapphire, emerald. Now cubic zirconia is also used. Other stones like zircon or topaz are not suitable and will not withstand the heating of the casting process.

Sterling silver ring – commercial wax set with sapphire

Gold ring, hand carved – set with sapphire

Cuttlebone used as components in jewellery

Broom casting as component in jewellery
By Carol
Another successful beginners day in February with some positive feedback and positive results.


By Carol
Below are samples of what has been achieved by one of our newer members in one month at the club, amazing job Lisa, love the enthusiasm.

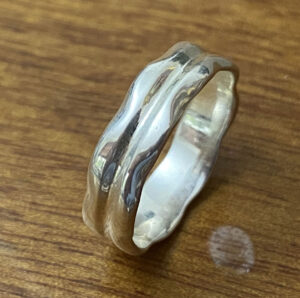

I made the bracelet first and have learnt some great techniques. Would have embossed it a little bit heavier and there’s a couple of solder joints that annoy me but overall happy with the result. Moved on to the other bracelet but extended it longer doing a single figure 8 and then a double link. Haven’t added a closing clasp yet. Might cut it and turn it into a couple of smaller bracelets or smaller necklace for my granddaughter. Possibly a toggle end or S shape clasp ….. to be continued lol. From the chain I got great experience with how much solder to use (don’t enjoy removing solder) and now feel confident soldering thinner gauge. Made a quick ring with filing, 70% happy with that one. Should have filed the middle line crisper only using the very end of the rats tail file. Made mistake of using more of the file. Not quite centred too. Went home and did it after class. We remember our mistakes.
By Carol
by Carol Money


Project 25 from Alan Revere’s “Professional Jewelry Making” Book
As many of you know I have been working my way through this book over the last couple of years. I have posted a few of the completed projects as I have finished them and a few of you will have seen me working on this latest one over the last few weeks. These are my 2nd and 3rd hinges ever and I was really pleased with the way they turned out, although setting them up literally took hours. The hardest part in the whole process was soldering on the small cap. With lots of help from Fiona I practiced using the Smith Little Torch until I finally managed to solder the cap (we are talking about 15 to 20 attempts).
By Carol
A big thank you to Peter, Diane, Kate, Jodie, Allan, Mitchell and Sara for sharing their beginners day work with us. Feedback comments are a mix of direct quotes and verbal comments as I remember them!

Peter and Diane – “Our first attempts at cabbing. We thoroughly enjoyed our time so far and are learning heaps. We found the marble easy to start first up but learned about different harnesses with the gympyite. On our second day we had some malachite, boulder opal and thundereggs from previous fossicking. Lots of fun and still learning lots from our mistakes”.

Mitchell – His first marble cab from the beginners day.
Speaking to Mitchell he was very enthusiastic, and gobsmacked by the results achieved. He said he thoroughly enjoyed the beginners day and the great instruction. Especially that he managed to complete his first piece using marble and start another in gympyite, showing the difference in hardness.

Kate and Jodie learning to sweat solder, on their first evening work session. Also learning about disc cutting and doming along the way.
By the sound of it lots of fun was had with this by both the new members and the instructors on the night.


Allan produced a stamped ring, and a simple pendant setting on the beginners day and then tried his hand at some sweat soldering at the next work session. Comments made were that he loved the day and was amazed at the results he came away with. He has been to a couple of work sessions and has started on chain making and still really enjoying it.


Sara – “Some pics of my work at the beginner’s workshop 🙂 It was a really nice day of learning to cab with other rock-loving newbies and seeing where everything is at the Club house”.
By Carol
The engineers trust of Peter Smith, Tom Power and Barry Kirkham have been at it again and have rebuilt the old flat lap machine from a wooden framed truck tyre based machine into a new shiny stainless steel “smicko” machine. Stainless steel has been used on all of our work surfaces now to make maintenance and cleaning easier for members.
A flat lap is available to make polished faces on larger rocks like the one shown in this photo.
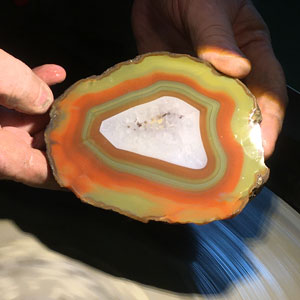
Using the 150mm diamond wheels for any stone larger than about 50mm is not permitted in the club. The reason for this is that it causes excessive wear on the diamond wheels which are expensive, and on a technical level, it is not possible to get a perfectly flat surface on a curved wheel. The only way to achieve this is either manually on a piece of glass or using the flat lap.
There are several laps provided with the machine, but all grinding from coarse through to prepolish are achieved using a rotating steel disk to which an appropriate grade of silicon carbide grit is added. Water is dribbled onto the disk to make a slurry and then the rock is held firmly against the steel disk with the silicon carbide being an abrasive element to the task. As the rock face is flattened, finer and finer grades (from 80, 200, 400, 600 up to 1,200 grade) are used to get rid of all scratches and defects on the surface of the rock. Important! Between each grade of grit the steel disk and the rock need to be thoroughly washed to remove all traces of the coarser grit.
Once grinding has been completed and everything washed thoroughly, the polishing process can be commenced. For prepolish, a copper lap is provided which should be used with 3,000 diamond paste.
To polish, a leather faced lap is fitted, to which a damp slurry of tin oxide is added to this lap to complete the polishing process.
Peter has provided a user manual, with which members should be familiar before using the machine.
When next in the club, have a look at this machine, adjacent to the saw room.
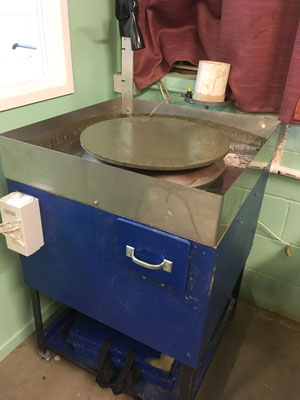
A big thank you to Peter, Tom and Barry for their efforts in providing top quality machinery for club members to use.
By Carol
Photos supplied by Carol S
Last week we saw the difference to the outside of the club house with a picture of the original building and one from this year.
Today I have pictures of the inside, before the extension.
Look closely at the background to see where the faceting is being carried out, and can you spot the library?
You may also spots some faces you recognise.
Faceting – May 2005

Faceting

Silver work February 2002

Silver work Sept 2004

This was taken in Feb 2009, but can anybody tell me what they are doing?

By Carol
by Pam
When I first joined the Club in 2003 Jean (Witt) was the only silversmithing instructor. She looked after the ordering of the silver and put a lot of time in teaching people. Her husband Len was a cabbing instructor and a member of QLACCA. They were both very supportive of NBLC, helping at stalls and shows throughout, until Len passed away. Jean later gave up teaching and eventually moved to Kilcoy (where she still lives). When the extension was built on the club, the committee decided to acknowledge Jean with “Jean’s Corner”.
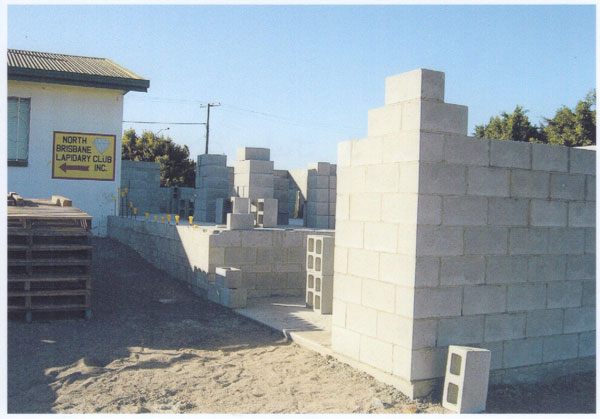
As you can see in the first photo the clubhouse was quite small. With only the kitchen, toilets, 2 faceting machines in a corner, saw room, a couple of cabbing wheels, silversmithing tables, a bookcase as storage and a library. It was due to a few people that put in the time and effort to build the extension.
With a lot of hard work and effort (plus a grant), the then committee decided to extend the club. First building the cabbing area, faceting room, gemmology room (now the office), and shed. Also making the toilets into a disabled access. After a couple of years, they then built the library, kitchen storage room and the office.
As for the photo of Milton (Fox) he has been making the tea on Wednesday mornings and setting things up outside for many years. So was nicknamed the tea lady (& mouse catcher at one stage). Also cleaning the toilets and kitchen areas.

Original Club House building taken from front (Nudgee road side) – Photo taken in October 2005

The Club House today taken from the back – photo taken January 2021
Spot the difference!

Foundations to the extension – May 2006

On goes the roof – October 2006
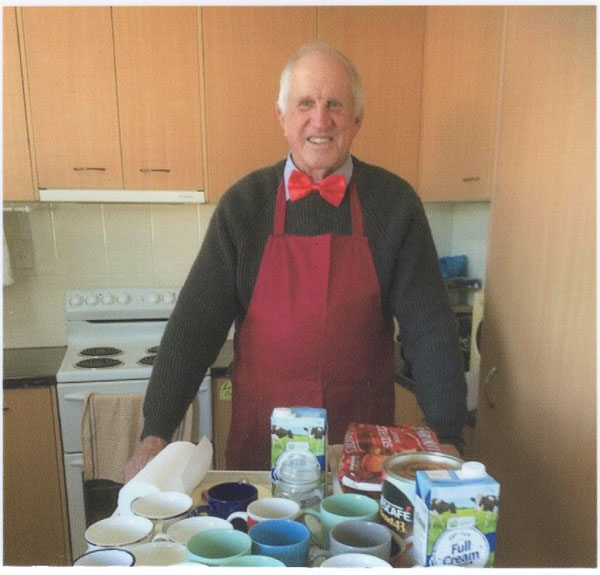
Milton
Up go the walls – July 2006

Jean’s Corner – taken 2016
By Carol
by Marie-Ann Coyle
Aussie Metal Clay is an Australian company and the owner Ros Bailey makes all the clays from silvers to base metals in many colours. Kim Booklass is the Senior Instructor, clay tester and clay designer. They have a web site and Facebook presence.
This is a different way of achieving an item in silver whether it is 99% or Sterling silver or Argentium 960 silver.
The silver particles which are in a fine dust are mixed with a clay binder to create a malleable clay.


The clay can be sculpted, rolled out, textured, moulded, stamped or many other ways to be used.
The idea is to not let the clay dry too much but there is a wonderful product that AMC make called Clay Stay. This allows you to join pieces wet on wet, wet on dry and dry on dry.
The item must be completely dry and as this was a larger piece, I fired it in my jewellery kiln to the firing schedule for the 999 and my kiln settings.
I fired both these pieces at the same time with another pendant.
As each kiln is different it is recommended to make a test strip and fire to make sure it is fully sintered (silver hardness).
Smaller pieces can be torch fired but there is a specific method to do this.
This is a fairly simple explanation and if you want more information please go to their web site and look at the tutorials on offer. Press on the Australian Flag!