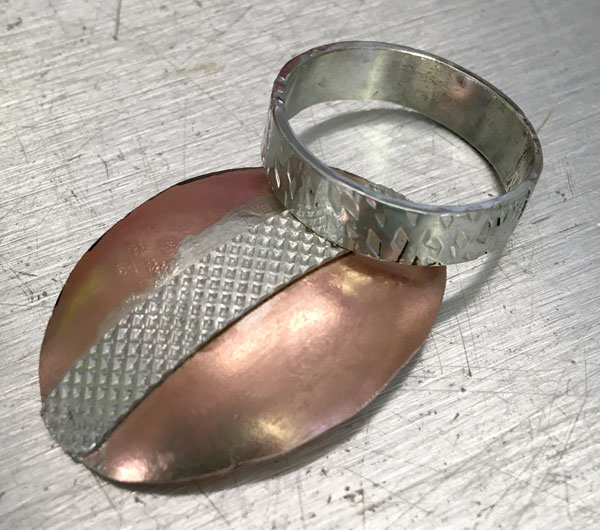
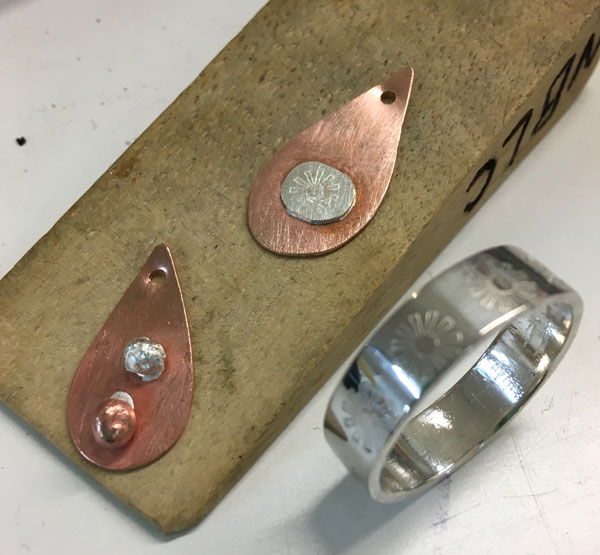
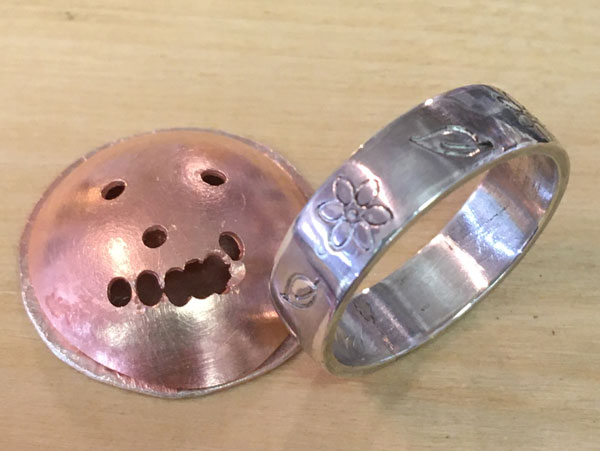
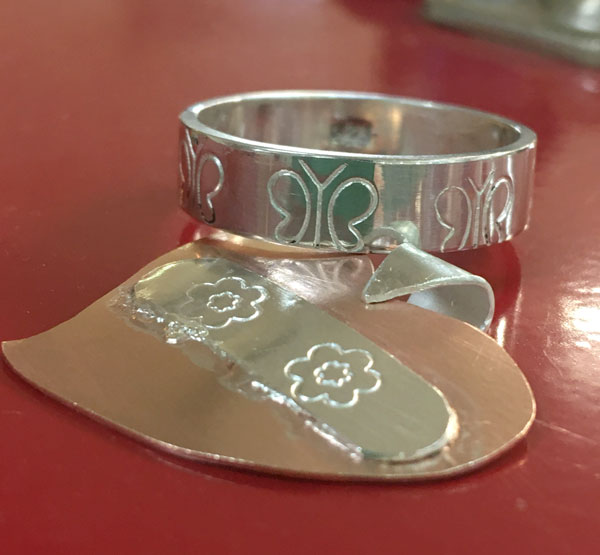
North Brisbane Lapidary Club

We Dig Rocks

  • Email
  • Facebook
  • Home
    • Activities
      • Gem Cutting
      • Fossicking
      • Metalsmithing
        • Beginner Silversmithing Projects
      • Gemmology
    • Membership
      • Constitution of the North Brisbane Lapidary Club Inc.
      • Costs and Fees
  • Visit Us
  • Gem Shows
    • QLACCA Gem Show Dates
    • Raffles & Prizes
    • Gem Shows Photo Gallery
    • Gem Show Dealers & Traders
  • News
    • Blog
      • Gem Show
      • Work Sessions Activity
      • Club event
      • Cabbing
      • Enamelling
      • Faceting
      • Fossiking
      • Metalsmithing
    • Newsletter Archive
  • Member’s Area
    • Calendar
      • My Bookings
    • Suppliers
    • Resources
    • Gems, Minerals and Rocks
    • Competitions
  • Log In
  • Log Out

Bezel set ring

June 10, 2021 By Carol

Made by Lisa

Lisa is one of our budding beginners, who has now completed all the beginner projects, the last one being this ring.  There was no bezel wire so she chose to go ahead with the stepped bezel making a feature of it.

I am really looking forward to seeing what she chooses to make next.

Filed Under: Metalsmithing

Stained Glass part 2

June 3, 2021 By Carol

by Carol M

So this is my second attempt at Plique-À-Jour enamelling. Not good enough to give to my friend for her 60th as I had planned, but ending up as an addition to my ever growing collection of earrings.

I started out laying the piece’s flat using the mica sheet, as with the test samples on the previous post, and filling in the areas with enamel. The enamel still sticks to the mica sheet and has to be then cleaned up, this led to cracks or the enamel falling out completely. I think maybe using 0.5mm fine silver was too thin, not giving enough thickness for the enamel to adhere to.

I then switched to the suspension method, using trivets and only very small amounts of enamel in the areas to be enamelled, building the layers very gradually. The first firing I let the kiln get too hot as the enamel dropped out, but I persevered being very careful not to let the kiln temperature reach over 785°C on subsequent firings.

This is very time consuming and I think I have spent at least 12 hours on these earrings, I am afraid to say this technique will have to wait until I have more time before trying again!


So I then tried the Champlevé technique, where areas of silver are either etched away to allow enamel to be laid into them, built up until they are the same height as the silver.  Instead of etching I tried another first for me and having pierced a design in a piece of silver, I fused it to a base plate.

Fusing, again a technique to be practised, there is a fine line between fusing and melting. I was getting better but as you can see there is some reticulation. The idea behind fusing is that you get the very shiny surface as a base for the transparent enamels but I have also read that by texturing the base it gives an interesting look to transparent enamels.  In this case I went with the texture.

Filling the areas with enamel was a much simpler solution than the Plique-À-Jour, but the enamels have still not come out as transparent as I was hoping.  Not sure if this is due the textured base or not freshly cleaning the enamel.  Maybe there will be a part three to this post ……

Filed Under: Enamelling

Feldspars

May 20, 2021 By Carol

by Ray Wilson

Feldspar is the name of a large group of silicate minerals that can be found in igneous, sedimentary, or metamorphic rocks.  Feldspars are commonly used in lapidary.  The coloured varieties make great cabochons and the clear type that can be found at Hogarth’s Range (west of gold coast) or Springsure Qld. can be faceted.  Feldspar has a hardness of 6 on the Mohs scale, so not as hard as quartz or agate.

Feldspar is an important industrial mineral being used to manufacture plate glass, container glass, ceramic tiles, plastics and other products.

Anyone interested in cabbing some Spectrolite see Carol South as the club has some material for sale.

Labradorite – a variety of plagioclase Feldspar.  Named after a location in northern Canada.   Labradorite displays an iridescent optical effect (or schiller) known as labradorescence.  Most material now comes from Madagascar.

The cause of this optical phenomenon is lamellar structure (very thin plates or flakes) with light being diffracted.

Spectrolite – A variety of plagioclase Feldspar found only in Finland.  Spectrolite is a trademarked name for this material.

Spectrolite from Finland
Labradorite from Madagascar

 The difference between Labradorite and Spectrolite is mainly that the background material in Labradorite is clear or translucent while Spectrolite the background is black.  Spectrolite tends to have more vibrant colours in reds, purples, and oranges.  Labradorite is generally vivid blues and yellow/bronze colours.

Moonstone – an orthoclase Feldspar that shows a pearly sheen or schiller.  This is the basis of the name moonstone.  Its name is derived from a visual effect, sheen or schiller (adularescence), caused by light diffraction within a micro-structure consisting of regular  lamellae.

Sunstone – is a plagioclase Feldspar that has either a hematite (iron stone) or copper inclusion.  Sunstone fund in Kong Bore Northern Territory has a hematite inclusion and appears as a series of rainbow-coloured specks rather than a schiller as in Labradorite or spectrolite

Kong Bore Sunstone

One variety of sunstone also found in the Northern Territory is a very rare Rainbow Lattice Sunstone

Rainbow Lattice


Oregon Sunstone from Oregon in USA has a copper inclusion which gives the stone a coppery coloured schiller.

Oregon Sunstone

Filed Under: Cabbing, Fossiking, Gems, Minerals and Rocks

KT-100 Mini Magnetic Tumbler

May 20, 2021 By Carol

Views from Thierry

You can get these 100mm magnetic tumblers on Ebay for about $300, supplied with and acrylic bowl, and 100 grams of 0.3 mm x 5 mm stainless steel pins. You still need to purchase some Tumblex Gleam powder ($20 for a jar at AJS).

Italian Brand name made in China. The tumbler is basically a magnet stirring the steel pins in the acrylic bowl.

These machines are perfect for tumbling intricate textured pieces and chains as the tiny pins can go and burnish every spot, unlike a traditional steel shot burnisher as the shots are much bigger. But these machines have a few quicks and drawbacks

  • Machine as supplied
  • Cracked Bowl
  • Machine Settings
  • You still need to purchase some Tumblex Gleam powder ($20 for a jar at AJS)
  • The acrylic bowl is of poor quality in my view, with the base cracking and leaking over time. Sourcing a replacement bowl at a reasonable cost is virtually impossible. So, I use a Pyrex Simply Store 2 Cup Round Storage Dish (11.4cm x 5cm) – $10 at BigW
  • The 100 grams worth of pins is ample enough, but sourcing additional pins is difficult in small quantity
  • The supplied pins look clean, but they are very dirty from the manufacturing. I tumble them twice before tumbling any jewellery pieces
  • You must leave the pins in a Tumblex Gleam solution to prevent any oxidation when not in use
  • You never ever leave the pins after use on the machine or your pins will get magnetised and become totally useless
  • Cleaning the pins is not easy their tiny size, I gently clean them under running hot water
  • As they clean/polish much more in details, chains notably, the solution gets dirty faster than a traditional burnisher. I clean and replace the Tumblex at every use
  • You will end up having pin marks on your pieces if you burnish for too long. 30 minutes is enough or 10-15 mins for recleaning a chain
  • Rinsing the Pins
  • Tumblex and how much you fill
  • Machine in use with Glass bowl

So, this is my method for using it, you may decide on your preference once you start using it

  • First use, clean the pins twice before use
  • In the glass bowl, put the 100 grams of pins, a quarter of a teaspoon of Tumblex Gleam and about 15-20mm of water in the Pyrex bowl. No need to stir the powder
  • Put your pieces (they should have been cleaned up to start with)
  • Close the lid and vacuum seal the lid.
  • Set the speed control to 4 – Maximum. I never bothered trailing different speeds
  • Set the green button to oscillate – it will change direction every couple of minutes
  • Put the glass bowl on the unit
  • Adjust the time control – 30 mins is ample
  • Switch power on
  • Keep an eye on it, to make sure to remove the bowl once finished
  • Once finished, wipe any water spill on the unit
  • Open the lid gently, place the bowl in a sink, gently run hot water over the lid into the bowl to rinse it in case there is some pins stuck under the lid. Gently run the hot water over the bowl to rinse the liquid, gently moving the media and pieces to dislodge any dirt. Once the water is clear, remove a piece at a time and rinse over the bowl to drop the pins back into the bowl. Once finish remove the excess water and leave 15-20 mm of water in the bowl. Collect any runaway pins back into the bowl. Add a quarter of a teaspoon of Tumblex Gleam. Dry the lid and vacuum seal close the bowl. Store on the side of from the machine (not on it!)

Overall an excellent machine if you use it properly. Perfect for home but not ideal in a club as you need supervision to make sure people don’t overfill or leave it on the machine after use.

I use it all the time at home and it is a god send, notably for burnishing chains and castings. I first clean my pieces in an ultra-sonic cleaner and/or use a toothbrush and dishwashing liquid.

Filed Under: Metalsmithing

Chloe and her new workbench

May 13, 2021 By Carol

by Thierry

My daughter Chloe started silversmithing as soon as she turned 12, and has already shown great skills, steady and neat work with her bracelets. While her visits to the club are limited due to school and other activities, I was looking at ways for her to do some work at home in a safe, supervised environment.

I found this old stainless steel medical trolley on Gumtree for $40 and found it perfect for her to use on the patio area, still under supervision. The inside of the trolley is ideal as a workbench and the lid perfect as a soldering station as the lid gives protection. These are the modifications I made:

  • 2 x locking wheels -$25
  • Rubber matting from an old conveyor belt to prevent parts from slipping – $0
  • 2 x storage trays from Kmart to build up height inside – $9
  • 1 x chopping board from Kmart, with a handy groove to catch up those things that slip away. I only had to shave off 5 mm each side $19
  • 1 Hebel block, hand sawn to size to make two blocks – $9

Chloe loves it and is looking forward to using it. Hope you find this article of interest.

Rubber Mat

Work Area

Storage trays

Soldering Station

Filed Under: Metalsmithing

Opals and mixed metals

May 6, 2021 By Carol

by Nick

Filed Under: Cabbing, Metalsmithing

Beginners Day April 2021

April 29, 2021 By Carol

We welcome another group of very enthusiastic beginners to the club – check out the results.

A few comments from the survey on “What did you enjoy most?”

  • Finishing a custom made piece to even wear home
  • Good company while learning to work with metals. The sawing was quite enjoyable as well as the soldering
  • Everything we were shown was great
  • Ring making
  • Entire day
  • Learning a new skill in a relaxed environment
  • The ease of explanation and practical explanation
  • Learning the processes and role of each machine
  • Really hands on good learning each step with a beautiful stone to take home.
  • Approachable and passionate instructors

Filed Under: Cabbing, Metalsmithing

Stained Glass

April 22, 2021 By Carol

by Carol M

Here are some samples of my first attempts at Plique-a-jour enamelling technique (French for “letting in daylight”).

After piercing a design in fine silver, I applied translucent enamel. The first firing I used a piece of mica to prevent the enamel from dropping through, subsequent firings I relied on surface tension placing the piece on trivets. To obtain clarity with no air bubbles only small thin amounts of enamel can be added at a time so a pretty time consuming technique.


After the gaps had been filled I removed any surplus enamel from areas on the silver, and also managed to remove large chunks from 3 of my nails and some skin without noticing! Not sure if I was concentrating hard or it was as it was under cold running water that I did not notice. Lastly one more firing to make the filed glass shiny once more.

The biggest lesson I learnt was to protect my fingers when cleaning up! I also think the areas of enamel to silver need to be larger to give a better effect, and perhaps better washing of the enamels would give a clearer effect.

Having a go was the best lesson.


Filed Under: Enamelling

Beginners Day March 2021

April 8, 2021 By Carol

March saw another very successful beginners day, once again with some very promising new members.  Below are the responses from the day and photos of their work.

What did you enjoy most?

  • Everything we were shown was great
  • Good company while learning to work with metals. The sawing was quite enjoyable as well as the soldering
  • Finishing a custom made piece to even wear home

What did you enjoy least?

  • The course ending
  • Trying to get scratches out of the silver ring, but it is a good learning experience
  • What did you enjoy least?

Use one word or a short statement to describe the day

  • Great
  • Fun
  • Fascinating. Informative. Friendly. Helpful

Additional feedback

  • It would be great to learn more about the possibilities of what can be done with silversmithing at the club
  • Very comfortable environment and will feel welcome to return as soon as allowed

Filed Under: Cabbing, Club event, Metalsmithing

Leaf Bracelet with Topaz

April 1, 2021 By Carol

by Thierry

A Leaf Bracelet with a Topaz Gemstone – A last minute request from Bel, who wanted a bracelet made for her friend’s birthday. I chose to make a leaf bracelet as I have never done one before. So why make one, when you can make two for twice the price. The process is rather simple. Take a long strip of silver, fold it in half flat lengthwise, texture it with a hammer on both sides, then open it back up. An easy process in principle but neatly folding the strip is not straight forward; and texturing at an angle is challenging. I added a topaz gemstone to enlighten the piece. Not a bad result for a first attempt and I was very popular at the club, happily banging to my heart’s content.


Filed Under: Metalsmithing

  • « Previous Page
  • 1
  • 2
  • 3
  • 4
  • …
  • 11
  • Next Page »

Copyright 2014 · Website Design Brisbane

Insert/edit link

Enter the destination URL

Or link to existing content

    No search term specified. Showing recent items. Search or use up and down arrow keys to select an item.