North Brisbane Lapidary Club

We Dig Rocks

  • Email
  • Facebook
  • Home
    • Activities
      • Gem Cutting
      • Fossicking
      • Metalsmithing
        • Beginner Silversmithing Projects
      • Gemmology
    • Membership
      • Constitution of the North Brisbane Lapidary Club Inc.
      • Costs and Fees
  • Visit Us
  • Gem Shows
    • QLACCA Gem Show Dates
    • Raffles & Prizes
    • Gem Shows Photo Gallery
    • Gem Show Dealers & Traders
  • News
    • Blog
      • Gem Show
      • Work Sessions Activity
      • Club event
      • Cabbing
      • Enamelling
      • Faceting
      • Fossiking
      • Metalsmithing
    • Newsletter Archive
  • Member’s Area
    • Calendar
      • My Bookings
    • Suppliers
    • Resources
    • Gems, Minerals and Rocks
    • Competitions
  • Log In
  • Log Out

Show & Tell – Enamelling

June 5, 2020 By Carol

by Carol Money

Enamelled Poppy Earrings

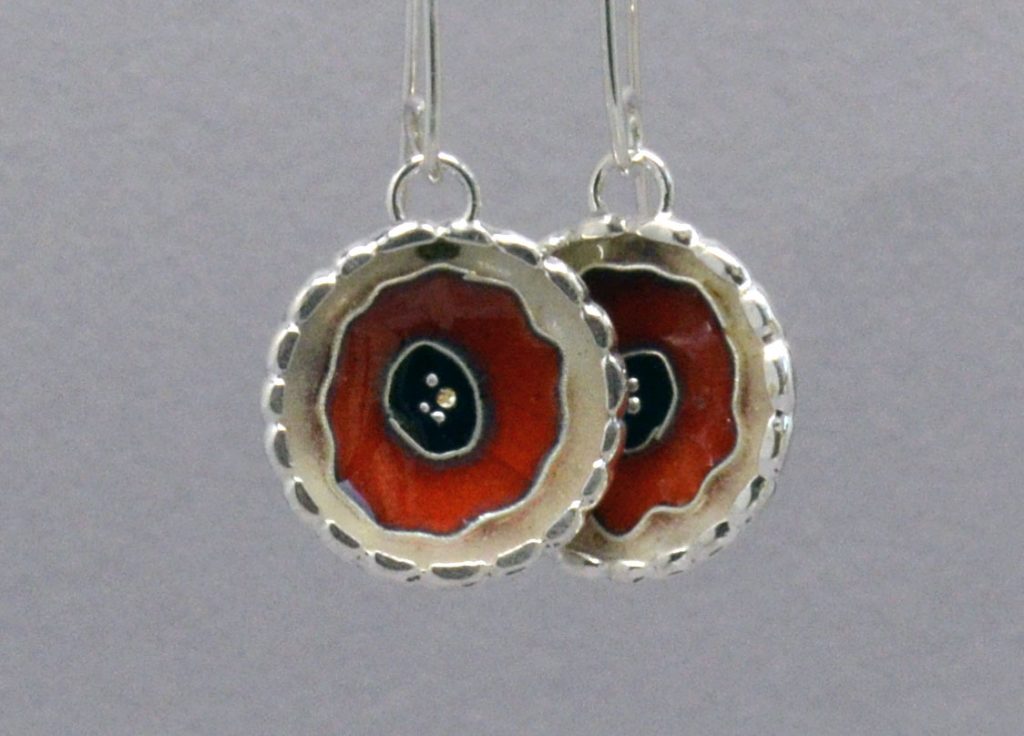
The story of the Enamelled Poppy Earrings

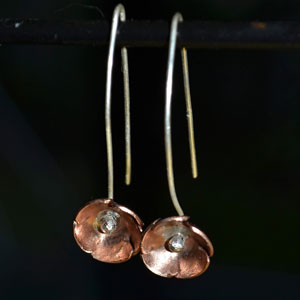
After a fun course on making copper flowers run by Sandy, I made some simple copper flower earrings to give to my friends on a trip to the UK. They were so well received I was asked by one of my friends to make some more, but if possible red so they would look like poppy’s.

Last year, on remembrance day, I realised I did not have any poppy earrings of my own and on emailing with my friend in the UK, neither had she. As she was also celebrating her 60th birthday that year the plan for some special poppy earrings began.

As many of you know I do like to dabble with enamels as well as silver work and thought it would be effective in the design to use a transparent red over silver, plus set the earring properly with a bezel as opposed to a hole drilled in the piece somewhere.

I eventually managed to finish them and posted the parcel to the UK in March, it eventually arrived in May.

I am happy to say my friend loves her earrings.

I am now excited by the prospect of getting back to the club soon to experiment with some more enamelling techniques soon.

Filed Under: Enamelling, Metalsmithing

Inlaying Stone

May 22, 2020 By Carol

by Peter Smith

I have been looking at the club website. I am impressed with the project’s members are doing at home. Mary’s Silver work has always been great. I would like to be that good. Carol’s locket and Ray’s casting are excellent. I have not been at the Club much since October 2018, but I am still working on projects at home. My latest endeavour is inlaying stone. The idea came from a You Tube Video (How to make a silver and turquoise inlayed ring without a lathe). Ray said I challenged him to make one, but all I said was it is easy. I didn’t mention that it is also easy to stuff up. The problems I had were crushing the stone and using too much glue. My last project was a pair of earrings and a pendent.


Filed Under: Cabbing, Metalsmithing

Twisted Bracelet

May 15, 2020 By Carol

by Mary Lancaster

Twisted Bracelet
Twisted Bracelet

Materials

  • 2m x 1.2mm round silver wire
  • 1m x 1mm square silver wire (twisted)
  • 9.5mm mandrel
  • 6.0mm mandrel
  • 1 x sterling silver clasp

Steps

  1. Using  9.5mm mandrel make 48  round wire jump rings    (add a few spares)
  2. Using  9.5 mm mandrel make 24 twisted wire jump rings  (add a few spares)
  3. Using  6.0mm mandrel make 2  round wire jump rings (ends)
  4. Solder 24 jump rings to start the bracelet, forming a twirl/twist pattern
  5. Add another 24 jump rings, placing behind each jump ring and then cross over and solder
  6. Add the 24 twisted jump rings, placing behind the two jump rings and then cross over and solder.
  7. Attach smaller jump ring at each end of bracelet and solder
  8. Attach clasp

              #  Total length of bracelet 22cm (without clasp)

Filed Under: Metalsmithing

Recycled Jewellery

May 7, 2020 By Carol

from Tierry Tomczak

Up cycled Pearl and Amethyst Pendant – A prime example of recycled jewellery. It is always a pleasure to go through someone’s unloved or broken jewellery and discuss their style and taste in jewellery. Found this beautiful battered pair of gold amethyst earrings and several pearls on studs.

The owner wanted a simple yet classy pendant out of them so I decided to reuse the whole earrings upside down, straightening the hook to attach the pearls and adding a bail. A rather simple concept, and she absolutely loved her new stunning pendant. The end of the wire is usually cut flush, but I left it as is. My first piece of jewellery in over a month and the joy of recreating love… Plenty of ideas in my head but too busy with everything else at the moment.

Filed Under: Metalsmithing

Soldering

May 7, 2020 By Carol

Filed Under: Metalsmithing

LMPJ Group project #19

May 1, 2020 By Carol

by Carol Money

My first ever locket which includes my first ever hinge. There is room for improvement, but it works, and so I am happy. Lots of new skills learnt and practising of old skills.

This was the next project in the group I am following (with a few other members of the club), “Lets Make Professional Jewellery” by Alan Revere. Luckily I had completed many of the tricky parts before the club shut, for example making the tube for the hinge, using the club draw plates. I had to improvise when cutting the tube from home as I do not have a tube cutter jig.

This is what I came up with.

A “V” shaped piece of copper in a vise. This held the tube straight but it really could have done with a clamp, other than my finger, to keep it in place, and a guide to make sure I cut straight.

Filed Under: Metalsmithing, Work Sessions Activity

Show and Tell

April 24, 2020 By Carol

by Ray Wilson

After a few failed starts and modifications to equipment aided by Ray Tierney and Tom Power I have now established a home casting workshop. 

I have made silicon rubber moulds, made wax patterns from the moulds, and then invested the wax models in plaster investment followed by burning out the model and using a centrifuge caster to produce sterling silver jewellery pieces – a complete end to end process. 

I have also been enjoying finishing off some boulder opal pieces; some of which were cut several months ago and were put aside.

This week I am going to have another attempt at making an inlay ring – challenged by Peter Smith.  The You Tube video makes it look simple, but I have discovered a few secrets to stuffing up an apparently simple process.  Peter is almost at the production stage now and has made up a special “dolly pot” to crush coloured rock to make the inlay.  If anyone wants to try this challenge below is the You Tube link.

YouTube – Inlay Ring

Filed Under: Cabbing, Metalsmithing

The Mystical Wizardry of the Smith

April 17, 2020 By Carol

by Jasson Roser (reference: Julia Lowther Shoebox Studio)

Magic of the Amateur Jeweller

We are capable of some wonderful things by creating silver work along with stonework, cutting, polishing and “voila” a beautiful creation. Of course, there are a thousand and one tiny little things we do between the idea and the finished item. Yeah.

I have been working with metals for a very long time, originating in the blacksmith area. I am still amazed by what we can accomplish. Whether by brute force or the subtle magic of science.

Yes, science fits well into blacksmithing as well as with silverwork. Now, I always applied the simple rule of “don’t force it, get a bigger hammer”. Most metals respond well to the magic of the smith. Sometimes a big Neanderthal like individual with a great hammer and anvil, or more often in our case the smith can be of the look of the typical man, woman and, yes even child. The one thing they must all abide by is the Rules. With pretty much everything we do there are rules and silversmithing is no exception.

Not long ago at the club we had incidences of pink silver. Don’t get me wrong, it was amazing that silver when placed in a hot pickle would remove any fire scale but also turn every surface of the silver “PINK”. Fantastic magical transforming my silver, to that of clean copper. Sign me up I need some lead and Merlin’s recipe for gold, and I’ll be quite content, yeah? Woohoo.

However, science is a cruel master, lead to gold still stays a mystery. I saw one of our instructors using a copper wire brush on said Pink silver, as you can see it’s difficult to remove. If you put steel or iron-based materials into a pickle your silver turns pink.

So, I’m not exactly happy with that, so I skulked away to my hidden lair (my house) and consulted the ancient visions of truth and wisdom (the Intergoogle)

I asked said entity “show me why silver goes pink ?” Now let me tell you, you must be more specific with your questions.

So, I asked again “oh great and wise inter google please show me the magic of why silver is turned to copper when I confuse myself by using iron-based tongs in the pickle”

To my astonishment the answer was displayed on my very screen. Not only the answer but the reason was illuminated alongside.

Behold my Brethren the answer to the curse of PINK silver

Copper is awesome.  It carries electricity through our world, and it makes many things blue, like octopuses’ blood and turquoise stones.  We’ve been making stuff out of copper for, oh, something like 10,000 years. Yep. Really.

No surprise that we magpie humans first used copper for jewellery (ooh, shiny, pretty!), and we are still using it, a lot of it, in making jewellery today. Even when metal isn’t copper coloured, it can still be mostly copper, like brass, bronze, and nickel silver (which, confusingly, contains no silver).

Most of the time, copper is a tremendously pliant and forgiving player in the jewellery studio, but occasionally it “misbehaves” and ends up in places we don’t want it to be. Sometimes… we pull a piece of silver or brass out of the pickle, and it’s… gah! it’s PINK!! Do not despair, chemistry is the cause, and chemistry will come to the rescue!

So, the thing about copper flashing – the thin layer of copper on the surface of sterling silver or brass that pickling sometimes produces – is that it has two causes, and one solution (there’s a pun in “solution”… we’ll get to that shortly). The most common pickle is sodium bisulphate dissolved in water.  After you solder something, this handy acid cleans the piece by eating the crusty flux and oxides off the surface.

Cause # 1 – Iron in the Pickle:

In the case of sterling silver, copper flashing happens when iron is introduced into the pickle pot.  This causes the copper in the pickle to plate out of the solution onto whatever objects are steeping in the liquid. For this post, I wrapped the chain below in a bit of iron binding wire and a few seconds in the pickle produced this spectacular result.

CLASSIC JEWELRY MYTH: “Pickle that has been contaminated with iron/steel is ruined forever and must be thrown away.” FALSE!

FACT: This contamination is TEMPORARY. Simply remove the offending iron/steel tweezers, binding wire, etc. and the pickle will return to its former more benign state. The only time the pickle is ruined is if you cannot remove all the iron/steel (i.e. tiny particles of steel wool remain in the pot).  Even if the pickle has eaten through the enamel on a metal pickle pot, exposing the iron/steel underneath, you can transfer the pickle to a different pot, and it will be fine. You’ll need a new pot, but not new pickle solution.

Cause # 2 – Zinc in the Alloy:

Copper flashing on brass happens not because copper is plating from the pickle onto the brass, but because the pickle is revealing the copper in the alloy.  Brass is composed mostly of copper.  The other main ingredient in the mix is zinc (a grey metal…go figure).  The pickle acid likes to pull the zinc off the brass surface, leaving the copper behind.  Sometimes the whole piece of brass will be completely pink, sometimes there will be just some areas that are pink and other areas will still be yellow brass (like the picture above).

SOLUTION – Etch the Copper Off with SUPER PICKLE:

In a small plastic container, mix equal parts of:

  • warm pickle solution (scoop a little bit out of your pickle pot*)
  • hydrogen peroxide (regular ol’ 3% stuff from the drug store)

I used about 1/8 cup of each.  A few tablespoons will do if that’s enough to cover your piece of metal. Don’t mix more than you need because the solution doesn’t keep.  It loses its efficacy within the hour.

Use PLASTIC tongs (or wood, or copper, NO iron or steel!) to drop your metal piece into the Super Pickle.

The results can be dramatic…

The pictures above and below are greenish because the pickle solution is a greenish blue.  The bubbles – vigorously obscuring the view in the images above and behaving more decorously in the images below – are indications that the Super Pickle is working, stripping the copper off the surface of the metal.

Remove your piece as soon as the copper is all gone.  Rinse it well.

Once the copper is gone from the surface of your piece, you will notice that the surface is also much less shiny and smooth than it was originally.  This is because the etching action of the Super Pickle has begun to bite into the metal under the copper flashing.  The longer the metal sits in the Super Pickle, the more the surface is etched, hence the instruction to remove the metal as soon as the Super Pickle’s work is done.

If you want the metal to be shiny again, you’ll need to polish it.

Bonus awesomeness?  After you are finished with your Super Pickle, pour it back into your pickle pot.  No mess. No waste.  The hydrogen peroxide breaks down very quickly into water and oxygen, so all you are putting back into your pickle pot is a bit of diluted pickle.  Since water evaporates from pickle quickly when it’s warm, you must add water to the pot every now and then anyway, so the spent Super Pickle helps keep the regular pickle solution at the right strength.

May the force of Super Pickle be with you,

Filed Under: Metalsmithing

Homemade by Mary

April 12, 2020 By Carol

Below are examples of three silver necklaces made by Mary over the last 3-4 weeks.

She has attached the materials she used and hopes to encourage you all to keep busy.

We would love to see what you have been working on too.

Necklace examples
Double Heart NecklaceTwirl Necklace   Filigree Heart Necklace
0.8mm square wire (twisted) 1.0mm round wire 8 sets of double hearts Silver clasp 58cm long1.0mm round silver wire Silver clasp 61cm long0.7mm square wire (twisted) 0.8mm round wire 29 twisted wire hearts Twisted wire joining links Silver clasp 58cm long

 All soldered links in each necklace.

Filed Under: Metalsmithing

Radial Bristles Grit/Colour Chart

March 29, 2020 By Carol

Filed Under: Metalsmithing

  • « Previous Page
  • 1
  • …
  • 3
  • 4
  • 5
  • 6
  • Next Page »

Copyright 2014 · Website Design Brisbane

Insert/edit link

Enter the destination URL

Or link to existing content

    No search term specified. Showing recent items. Search or use up and down arrow keys to select an item.